
Zero to complete, a step-by-step guide to setting up an Express project from a vet
This is part of an ongoing series of articles for setting up a full client/server Express based node application.
- 0: Environment Setup, Eslint, Airbnb style guide, Prettier
- 1: Project Configuration, Node env vs Project env
- 2: Middleware, Logging: Winston & Morgan
- 3: Data Storage: Native Mongodb
- 4: Authentication: Middleware & Secure Cookies
- 5: Testing: Jest and Supertest
- 6: Code Documentation: JSDoc
- 7: Client JS bundling, Rollup
Code is available at github and is tagged at each stage of development.
Background: Interactivity and User Accounts
Up to this point, all of our work has been on setup, now we will finally write client code and get some interactivity.
Implementation overview:
- We will create a landing page, index.html, which will have a form to allow for either registration or login. We will also add two convenience links to try to go to a protected “home.html” page, and another to logout our user.
- Create a users controller and add routes to app.js to support /login and /register functionality
- We will update our app.js to add middleware to check for state info from our client (via a cookie) and create a protected route.
Front-end, Client Development
When a feature has both a UI and back-end component, I prefer to work on the more flexible one first, ie the front-end. So, I’ll start with the UI to register a user. Infact we can combine both the register and login UI. Remember we simply need something to exercise our expressjs code, so we aren’t winning any UI awards here :p
Start by creating a “client” directory in the root of your project. There we will create 2 html files. Eventually we will organize our files into various component directories, but for now lets just get things wired together and working. We will embed all our html, javascript, and styles into each html file.
This “client” directory holds client source files. Eventually we will create another directory called “dist” which will contain optimized or bundled versions of the files which will be served directly by the webserver. For now though, we will not run through the files through any compiler or bundler and will serve them directly from our source “client” directory.
<!-- client/index.html -->
<!doctype html>
<html lang="en">
  <head>
    <meta charset="UTF-8" />
    <meta http-equiv="X-UA-Compatible" content="IE=edge" />
    <meta name="viewport" content="width=device-width, initial-scale=1.0" />
    <title>Document</title>
  </head>
  <body>
    <p><a href="/home.html">Go to protected route: home</a></p>
    <p><a href="/logout">Logout, delete client state token</a></p>
    <form action="" id="multiAuth" method="post">
      Email: <input type="text" name="email" /> Password: <input type="text" name="password" />
      <br />
      <input type="radio" name="action" value="register" /> Register
      <input type="radio" name="action" value="login" checked="true" /> Login
      <button id="processForm" type="submit">submit</button>
    </form>
    <script type="text/javascript">
      const handleSubmit = async function (e) {
        e.preventDefault();
        const form = event.currentTarget;
        const formData = new FormData(form);
        const url = "/" + formData.get("action");
        if (formData.get("email").trim() === "" || formData.get("password").trim() === "") {
          alert("please fill in all fields");
          return;
        }
        fetch(url, {
          method: "post",
          redirect: "follow",
          body: JSON.stringify(Object.fromEntries(formData.entries())),
          headers: {
            "Content-Type": "application/json",
          },
        }).then(resp => {
          if (resp.redirected) window.location.href = resp.url;
        });
      };
      const multiAuthForm = document.getElementById("multiAuth");
      multiAuthForm.addEventListener("submit", handleSubmit);
    </script>
  </body>
</html>
This is a basic index file which contains a link to a protected route, a link to logout, and a form to either register a new user or to login with an existing user. It’s ugly, but as we will see shortly, it works.
Here’s another basic html file which we will use as the target of our protected route:
<!-- client/home.html -->
<!doctype html>
<html lang="en">
  <head>
    <meta charset="UTF-8" />
    <meta http-equiv="X-UA-Compatible" content="IE=edge" />
    <meta name="viewport" content="width=device-width, initial-scale=1.0" />
    <title>Document</title>
  </head>
  <body>
    <h1>protected user home dashboard</h1>
  </body>
</html>
Back-end, Server-side Development
Now with our UI wrapped up, lets focus on our backend. We start by adding two packages that we’ll need when adding new users to our database, and when persisting login sessions on the client.
\> npm install cookie-session bcryptCookie-session is an NPM library which will allow us to create secure cookies which are both encrypted, and tamper proof. As you will soon see, along-side the cookie we will be using, a signature file will also be created to ensure that the client did not modify our cookie.
Bcrypt is an encryption library we will be using to encrypt the users password before we save it to the database. You can read more about this, however the important part of these two libraries, is that once data has been encrypted, it can not be decrypted. Instead, on a subsequent login, the submitted password is again encrypted, and that is compared with the encrypted password from the database. If they match, the user can be logged in. The password itself will never be decrypted, and due to the nature of the encryption, is extremely difficult to do.
Now lets create our users controller. Start by creating a “controllers” directory and users.js file.
/\*\*
 \* @module users
 \*/

const bcrypt = require('bcrypt');
const path = require('path');

module.exports.init = async (config, logger, db) => {
  this.userCol = db.collection('users');
};

module.exports.login = async (req, res) => {
  const record = await this.userCol.findOne({ email: req.body.email });
  if (record === null) {
    res.status('401').json({ msg: `no record found with email ${req.body.email}` });
  } else if (!bcrypt.compareSync(req.body.password, record.passHash)) {
    res.status('403').json({ msg: 'wrong password' });
  } else {
    req.session.ref = record._id.toString();
    res.redirect('/home.html');
  }
};

module.exports.register = async (req, res) => {
  const user = {
    email: req.body.email,
    passHash: bcrypt.hashSync(req.body.password, bcrypt.genSaltSync(10)),
  };
  const ref = await this.userCol.insertOne(user);
  if (!req.session) req.session = {};
  req.session.ref = ref.insertedId.toString();
  res.redirect('/home.html');
};

module.exports.logout = async (req, res) => {
  req.session = null;
  res.sendFile(path.join(req.app.locals.projDir, '/client/index.html'));
};
With that controller, we will update our app.js file to use it, and also use the cookie-session module we installed earlier:
// app.js
const express = require('express');
const morgan = require('morgan');
const cookieSession = require('cookie-session');
const userRoutes = require('./controllers/users');

const app = express();
app.locals.projDir = __dirname;

app.use(
  cookieSession({
    name: 'session',
    maxAge: 1000 \* 60 \* 60 \* 24 \* 7, // miliseconds from now to expire, 1wk
    httpOnly: true, // unreadable via client JS
    sameSite: 'lax', // only sent from same website
    signed: true, // include signature to check tampering
    // secure: true, // must be over https
    keys: \['s3cr3t'\],
  })
);

app.init = (config, logger, db) => {
  userRoutes.init(config, logger, db);
  app.use(
    morgan('tiny', {
      stream: {
        write: (message) => logger.info(message),
      },
    })
  );

  const checkAuth = (req, res, next) => {
    if (!(req.session && req.session.ref)) {
      if (req.headers\['x-requested-with'\]) {
        // if request is an ajax request send json back
        res.status(302).send({ url: '/' });
      } else {
        res.redirect('/'); // do normal 302 redirect
      }
    } else next(); // they have an untampored with token, could further validatate here
  };

  app.use(express.urlencoded({ extended: true }));
  app.use(express.json());

  app.get('/', (req, res) => {
    logger.info(`running in ${config.app.env} environment`);
    res.sendFile(`${__dirname}/client/index.html`);
  });
  app.get('/home.html', checkAuth, (req, res) => {
    res.sendFile(`${__dirname}/client/home.html`);
  });

  app.post('/login', userRoutes.login);
  app.post('/register', userRoutes.register);
  app.get('/logout', userRoutes.logout);
};
module.exports = app;
I’ll start at the top in the explanation of the file. First, we add a convenience variable to “app.locals” that will always be available in our express app. In this case, we want to capture our current directory where our app.js file is run, this will serve as our base directory.
Next we add cookie-session to our app via the “use” function. This means that every request will run though this function, and in this case, bootstrap each request with user data from our cookie. Since we are currently in development and don’t yet have https setup up yet, we will not add that cookie parameter.
We also have out app initialization where we set some variables, remember we call app.js from our serve file after the database and logger has been setup. We then create the middleware which will be called before protected routes to ensure that the user is properly logged in. If not, they will be redirected to the index page. Next we do setup our app to decode requests with urlencoded payloads and is based on the older body-parser and also decode any requests that have content type json.
Finally we’ve added new routes for user functions. We have three “get” handlers, namely ”/” for the index page, a protected page, and our logout route. We also handle posts to login and register.
Result: Protected Routes and Client State Saved
With all that done, you can run the app from our package.json script:

then open a we browser to localhost:3000:
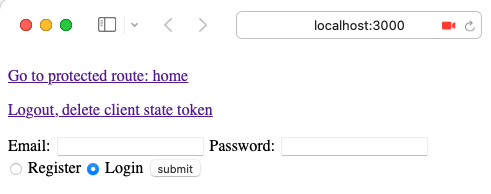
You will find our very plain, but functional landing page. From there, try going to the protected route and nothing happens. Instead you can try to register, and you will be redirected to the protected page, or, with that registered account, you can login, and you will go back there.
Last, inspect the page storage and look for cookies. You will see one if you have logged in, and even after closing the browser, you will maintain the ability to go directly to the protected route. Try deleting it, and you will lose the ability until you login again.
You now have a functioning app with both serverside and client side code. You can check the github repo for the tag v1.4 or see the delta here. In our next post we will focus on testing.
References
Good example using fetch and FormData:
https://simonplend.com/how-to-use-fetch-to-post-form-data-as-json-to-your-api
In the next article we will look at how to configure testing for our application using a test framework called jest and a headless browser called Supertest.