A few days ago I decided to reorganize web hosting for a few of my personal websites. Years ago I paid for a VPS at Linode and a nodejs app on Heroku. Later, I moved everything to Amazon, provisioning all my website and webapps on a single EC2 instance. I set it up as Ubuntu instance, and built it from scratch, thanks to various VPS guides, special thanks to Digital Ocean for their great VPS docs. Eventually I configured that single EC2 instance to serve 4 webapps, and 7 static websites.
Lately I’ve been using AWS alot for work, and have gotten more conformable with their services. I’ve decided to move my static websites off of the EC2 instance, and onto a simple file storage hosts, namely Amazon S3. That, along with a few other AWS services like codeCommit and CloudFront, make it a complete setup and even easier to update and maintain.
So, this setup guide is for you, and since I can be quite forgetful, is partly for me :-p
It’s not hard, but all all the configuration can be tricky so i’ll walk you though it here. Everything you need to host, update, and secure a very fast/performant personal website, Amazon provides for free up to a limit. The free limit is quite high, so unless you’re launching an extremely popular static website, you won’t have to pay anything (assuming you follow the guide below).
So, if you have a local website, want to create one, or you are migrating from another host, this guide is for you (and me :-)
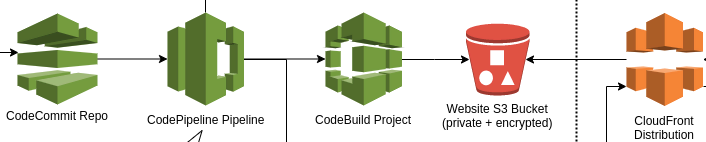
This guide assumes that you have source files, which you will compile into the static website files. If you don’t have that yet, I will also show how to generate one using a popular web template. With that, I will show you how to setup a repo to push your source files to (CodeCommit), and setup a process (CodePipelines) to compile those files (CodeBuild) and copy them to a storage location (S3). It will also show you how to configure a CDN, in-front of those files to send them to users quickly (CloudFront). That service will also provide you with SSL/HTTPS security for your website. Afterwards we will show you how you can point your DNS records to your newly hosted website on Amazon.
This guide is divided into six sections:
- Setup AWS Account and Create IAM user
- Create or Prepare Local Source Files
- Create Source Code Repository
- Create the File Space to Store your Web Content
- Create Workflow for Updates and Deploy to S3
- Setup the CDN and Point your DNS to Amazon
0) Setup AWS Account and Create IAM user
Before getting started, you will need to sign up for an account on aws: https://aws.amazon.com
Now, that you have that root user with attached billing you should create another user which will be doing the operations. This adds another layer of security to protect your main/root user. So, go to the Identity and Access Management (IAM) page here: https://console.aws.amazon.com/iam/home?region=us-east-1
On the left, click users, then Add user. On the next screen, input a Username, under access type, click the box for Console access, set a custom password, and uncheck Require password reset.
For groups, add the new user to the admin group (we will be adding individual service permissions later). Skip tags, and click Next: Review, then Create User.
With that user created, first copy your current account number, which you’ll find near the top by clicking your billing account username. In the first line you’ll see Account ID: 000000 Copy that number and save it. Afterwards, sign out of your billing account user and click the “Log back in” button. This time sign in using the credentials for your newly created user (you might need to click the sign in to a different account link to see the option for IAM users). First enter that account ID which you had previously copied, then the newly created username and password.
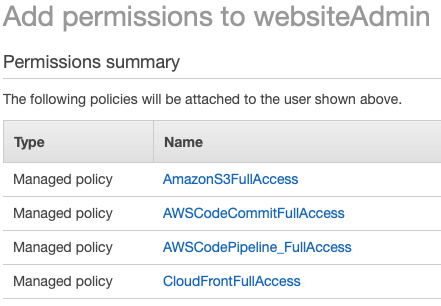
Now, time to add permissions. From the main console, click IAM, then Attach existing policies directly. We will need these so for now, add them with full access:
1) Create or Prepare Local Source Files
Ok, now that we have our user setup. We have one more preliminary step, adding a buildspec.yml file to our repo. When we push code to our repo, this script is what is run to put things in the right place (similar to a git post-recieve hook). Incase you don’t already have a repo, you can quickly create one using the tried and true https://html5boilerplate.com
To create a website from the h5bp template, you can use the the command line if you have npm/npx setup. Also you should have a git repo setup and ready. .
npx create-html5-boilerplate [websiteName].com
cd $_
git init
git add .
git commit -m “initial files generated for [websiteName] by h5bp”
next, add a buildSpec.yml file to your repo with these contents
version: 0.2

phases:
  install:
    runtime-versions:
      nodejs: 12
    commands:
      - npm install
  build:
    commands:
      - npm run build
artifacts:
  files:
  - '**/*'
  base-directory: "dist"
  discard-paths: yes
btw, it’s a yml file, so indentation is important and don’t forget to add and commit it to your current git repo
git add .
git commit -am “add buildspec file for codeBuild project”
2) Create Source Code Repository
Ok, with those steps out of the way, we can now begin creating AWS resources, starting with a place to put our code. https://console.aws.amazon.com/codesuite/codecommit/repositories
Also, in the top right you’ll notice your region, keep an eye on that as you typically want to always be in the same region.
Click the “Create repository” button, fill out your repository name. Once your repo is created, check out the connection steps to setup your ssh key and get the url of your new repo. With that url, set the remote on your local machine to point to your new repo and push your code (replace the region & nameOfRepo):
git push —set-upstream ssh://git-codecommit.us-east-1.amazonaws.com/v1/repos/[nameOfRepo] master
Have a look at your repo from the aws console and you’ll see all your local files sync’d to your remote repo.
3) Create the File Space to Store your Web Content
open: https://console.aws.amazon.com/s3/
create bucket with full name of website, very important to include the www. and .com:
www.\[yourdomain\].com
Set your Region
uncheck Block all public access
leave Bucket Versioning disabled (we already have code versioning from earlier)
click Create bucket
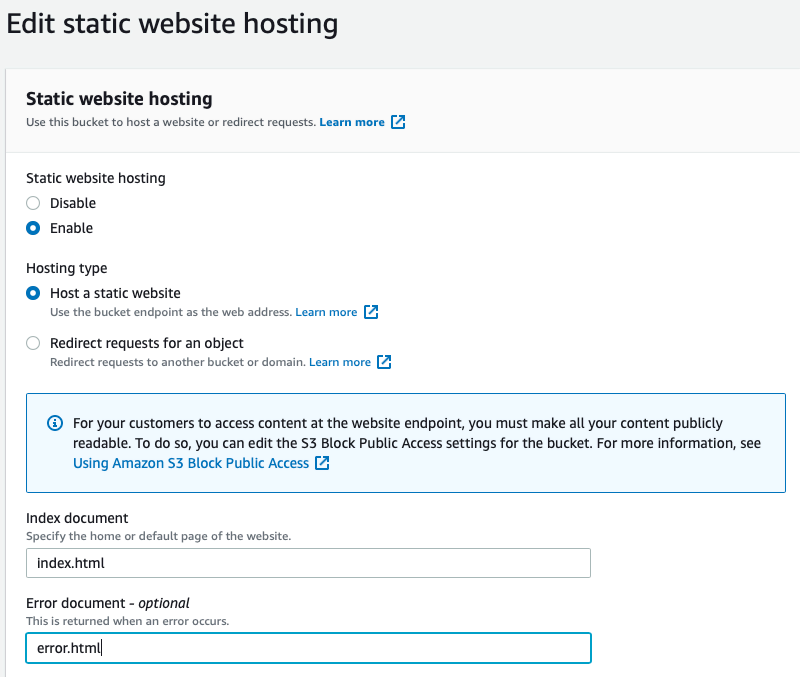
from the bucket list, click your newly created bucket, then click the Properties tab, scroll to the bottom and click [Edit] Static website hosting
on the next screen click Enable, Host a static website, index.html & error.html respectively
next, click the Permissions tab, make sure the block all public access is unchecked, then scroll down and edit the Bucket Policy (replace yourDomain)
{
    "Version": "2012-10-17",
    "Statement": [
        {
            "Sid": "PublicReadGetObject",
            "Effect": "Allow",
            "Principal": "*",
            "Action": "s3:GetObject",
            "Resource": "arn:aws:s3:::www.yourDomain.com/*"
        }
    ]
}- Create the workflow, basicly the setup to process our buildspec from earlier
4) Create Workflow for Updates and Deploy to S3
Time to create our code pipeline, go to open: http://console.aws.amazon.com/codesuite/codepipeline/home
Name your pipleline, leave the default of creating a new role and associating it to your new pipleline. Click Next.
Source Provider: AWS CodeCommit
Repository name: the dropdown will display the repo you created earlier
Branch name: master
leave defaults, click Next
Build Provider: AWS CodeBuild
select your region
click Create Project
write a project name,
leave default managed image
OS: Ubuntu
Runtime: Standard
Image: Latest (currently standard:5.0)
Leave the rest as default and click, Continue to CodePipeline, Next
Deploy
Provider: Amazon s3
Bucket, select the bucket you created earlier
click checkbox to Extract file before deploy
Click Next
Click create Pipeline, next you will see each stage of the pipeline you created and eventually you will see the site deployed.
Once the deploy finishes, click the Amazon S3 link click the Properties tab, scroll to the bottom and click on the s3 url to bring up your hosted site.
5) Setup the CDN and Point your DNS to Amazon
open https://console.aws.amazon.com/cloudfront/
click, create distribution
get started, then select your s3 bucked in origin domain name: [select S3 bucket]
Under Default Cache Behavior:
select Redirect HTTP to HTTPS
Under Distro Settings:
Price Class: Use Only USA, Canada, Europe //if not, you could have a high bill
add Alt Domain names: www.yourdomain.com, yourdomain.com
SSL Cert: Custom SSL Cert
Then click Request or import cert with ACM
input the two domains you entered earlier //using your own domain of course
www.yourdomain.com
yourdomain.com
Next, then DNS Validation if you have DNS access, Email validation if you don’t
Skip Tags, and click Review
Follow the DNS or Email Validation steps
Back on the Create Distro page, make sure to set the Default Root Object as index.html
Leave defaults for the rest and click Create Distribution at the bottom
Once the distro is ready, click it and look for the Domain Name.
You can directly access your website using that URL and if you have registered your domain name, you can go to your DNS settings and add it. First, you should create an alias record for yourDomain.com with value of www.yourDomain.com and then a cname record from www.yourDomain.com to [your cloudFront Domain Name]. It could take a few moments to update, and afterwards you’ll be able to access your distro from your own domain name url.
In an upcoming guide, I’m looking to do the same thing but via using the Amazon CDK, as a developer, I’d love to have infrastructure as code, and further automate the process. However if you have only one website, just use the console as outlined above.
References:
Of course, the first resource was from the source https://docs.aws.amazon.com
I also found valuable information from https://sanchezbits.com/2019/10/25/how-to-host-a-static-website-on-amazons-aws-with-ssl-using-s3-certificate-manager-cloudfront-and-route53/
and from https://medium.com/@willmorgan/moving-a-static-website-to-aws-s3-cloudfront-with-https-1fdd95563106
For those who would like to do the same as above, though using a CDK script, check out my next article doing a similar task, but automated with code.