Background
As a mac user, I remember when switching from my old 2015 intel based MBP to my 2020 M1 based macbook air. For the most part, the transition from x86 based intel to arm based apple silicon was easy, however there was a bit of a pain in the Docker transition.
At the time, I figured out the problem, though unfortunetely I forgot about it, and the solution I had setup. Basically on the M1 mac, the more safe bet when using docker is to build to an AMD64 architecture rather than the native ARM64 bit architecture. You can do that by using build with buildx. So that I always did it, I added some code into my .zshrc file. It’s a file that’s run when starting zsh, the shell that replaced bash as the default osx shell a few versions ago.
The snipet was:
# useful only for Mac OS Silicon M1
# still works with other platforms, but no changes

docker() {
  if [[`uname -m` == "arm64"]] && [["$1" == "run" || "$1" == "build"]]; then
    /usr/local/bin/docker "$1" --platform linux/amd64 "${@:2}"
  else
    /usr/local/bin/docker "$@"
  fi
}
I even added comments to remind myself what was happening, if I ever bothered to look in the zshrc profile again :p.
Basically, whenever i call docker from the command line, the script checks to see if it’s being run on Apple silicon, if so I call docker, pass the first argument, add in an explicit platform definition, and use the next part original parameters. If it’s being run on a non-apple silicon based mac, I simply call docker normally with all the original arguments.
I had forgotten about this, and recently have been working with various amd64 and arm64 images. I was getting funky behavior due to that alias. I even went through basic docker docs. Now I’ve decided to make myself this quick post, partly to remind myself, to also investigate the current state of arm64 support, and last to serve as a quick cheat sheet for Docker.
Linux Container History
Thanks to an explanation from my friend Ben years back, I remembered that Docker leverages a process in Linux which sandboxes environments. Remember that Linux was based as a server with multiple users, groups, permissions, etc.
To do a proper explanation: Back in the 70’s when mainframe computers were the norm, and users had basic hardware, think monitor/keyboard thin clients, connected to a shared machine. In this environment, processes from a single user, needed to be isolated from those of another user.
Over the years, more tools were built to support this user/process isolation. In 1979 a tool, chroot enabled changing the root directory of a process, along with children, to a new filestystem location. Later, in 2000, FreeBSD (a unix-like distro) introduced jails with more advanced support for OS-System-Level virtualization, allowing for explicit network interface and IP address isolation. A year later Linux-VServer was defining a similar partition system for file system, network addresses, and memory. In 2005 the OpenVZ was released for operating system level virtualization.
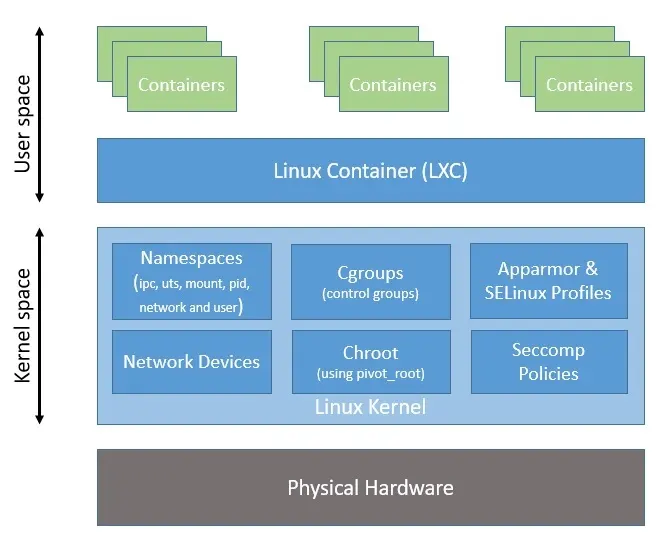
This developments lead up to Linux Containers (LXC), the first implementation of a container manager. It was created and integrated into every linux distro by 2008. It leveraged cgroups and was based on open source contributions from Google.
Stage is Set for Docker
While LXC handled all the complicated parts at the userspace level, it was still not easy to use. To address that and promote adoption, Solomon Kykes, during his work with dotCloud, a Platform-as-a-Service (PaaS), develped Docker. In 2013 it was released as an open source project.
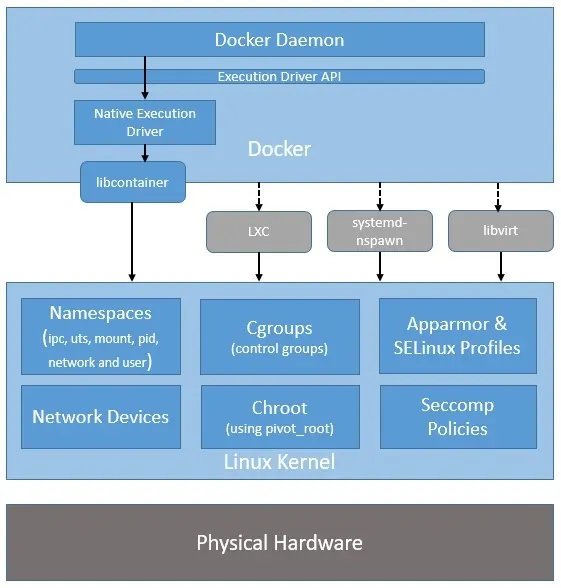
Initially it leveraged LXC as it’s default environment, however it later developed its own, called libcontainer. It’s written in Go, opensource, and is still actively updated.
Docker is optimized for deployment of applications, and provided a simple format for bunding apps and their dependencies into easily portable containers.
It also leverages images, and promotes layers of images. This allows for the reuse of parent images, to create more specialized ones. It also adds versioning and allows “diffs” between versions.
The afformentioned features, plus a public registry of images, Docker Hub, promots community adoption. Other tools have been built for it, or integrated with it, for example: Chef and Puppet for config management, integration with Jenkins and Travis for CI, and Kubernetes for container orchistration.
Docker CLI Cheat Sheet
Here the most common commands I use.
Running Containers
# Start a new image
  docker run [IMAGE]

# with assigned name
  docker run --name [NAME] [IMAGE]

# with port assignment
  docker run -p [HOST_PORT:CONTAINER_PORT] [IMAGE]

# with all ports assigned
  docker run -P [IMAGE]

# start in background (--detach)
  docker run -d [IMAGE]

# with assinged hostname
  docker run --hostname [HOST_NAME] [IMAGE]

# with mapped local directory
  docker run -v [HOST_DIR]:[TARGET_DIR] [IMAGE]
Managing Containers
# list running containers
  docker ps

# list all containers
  docker ps -a

# delete stopped container
  docker rm [CONTAINER_NAME]

# stop and delete container
  docker rm -f [CONTAINER_NAME]

# delete stopped containers
  docker container prune

# start container
  docker start [CONTAINER_NAME]

# stop container
  docker stop [CONTAINER_NAME]

# copy file to container
  docker cp [SOURCE] [CONTAINER_NAME]:[TARGET]

# connect to container and run shell
  docker exec -it [container] [bash|sh|zsh]
Info & Stats
# Show logs of running container
  docker logs [CONTAINER_NAME]

# Show stats of running containers
  docker stats

# show all modified files in container
  docker diff [CONTAINER_NAME]
Update to Clear up Similar Commands
Recently I looked at Docker again and noticed two sets of commands that seemingly had the same capabilities, so I was confused why have both.
COPY vs ADD
Both have the ability to copy local files to the Docker container, however the ADD command adds the capability to 1) copy from a network source, 2) unpack/extract archives/compressed files.
I was surprise to learn that ADD came first, and COPY was added later. Infact, unless you specifically use the uncompress functionality, it’s recommended to use COPY. Even when you need remote file access, it’s recommended to use RUN with wget or curl in the docker container to download remote files.
From my research, it seems that ADD can lead to unpredictable behavior, and is not recommended unless you need to copy a compressed file.
ENTRYPOINT vs CMD
Basically use CMD for default behavior, which can be overridden if you pass arguments when running the container from the CLI. For example, suppose you have a container with a python scripts that takes an argument and prints it.
FROM python:3.8
COPY . /app
WORKDIR /app
CMD ["python", "script.py", "Hello, Docker!"]
If you run it with docker run [image], it will print “Hello, Docker!“.
However if you run it with
docker run [image] python script.py "Hello, World!, it will print Hello, World!.
On the other hand, if you want a fixed command to be run everytime you run a container, use ENTRYPOINT. Bear in mind that any command line params will be appended to the end of the ENTRYPOINT command.
For example:
FROM node:14
COPY . /app
WORKDIR /app
ENTRYPOINT ["node", "app.js"]
If you run it with docker run [image], it will always run node app.js.
It’s common to combine both ENTRYPOINT and CMD to set a fixed executable command, with default arguments. The defaults can be overwridden as we’ve shown ealier, but the ENTRYPOINT is fixed.
FROM ubuntu:20.04
COPY . /app
WORKDIR /app
ENTRYPOINT ["./utility-tool"]
CMD ["--help"]
By default if you run the image with docker run [imagename], it will run ./utility-tool --help as defined in ENTRYPOINT and CMD.
Or the help param can be overridden using docker run [imagename] --version, which runs the fixed ENTRYPOINT, and the overridden CLI argument, hence ./utility-tool --verison will be run.
How About Projects With Multiple Containers?
In projects using Docker Compose, the approach to managing Dockerfiles and the docker-compose.yml file depends on the complexity and structure of the project. Here are common scenarios:
Multiple Dockerfiles with a Single docker-compose.yml
- Typical in Larger, Multi-Service Projects:
- Projects with multiple services (e.g., web server, database, caching service) often have a separate
Dockerfilefor each service. - Each service’s
Dockerfileis responsible for defining the environment for that particular component.
- Projects with multiple services (e.g., web server, database, caching service) often have a separate
- docker-compose.yml:
- The
docker-compose.ymlfile orchestrates these services, linking them together. - It specifies which
Dockerfileto use for each service and how these services interact (networks, volumes, environment variables, etc.).
- The
- Why This Approach?
- Modularity and Clarity: Separate
Dockerfiles for each service keep configurations clear and isolated. - Ease of Maintenance: Changes to one service’s environment don’t affect others.
- Scalability: Easier to scale individual services.
- Modularity and Clarity: Separate
Single Dockerfile with a docker-compose.yml
- Common in Smaller or Single-Service Projects:
- Simpler projects or those with a single primary service might use just one
Dockerfile. - The
Dockerfilesets up the necessary environment for the project.
- Simpler projects or those with a single primary service might use just one
- docker-compose.yml:
- Handles the orchestration aspects – like port mapping, volume management, setting up networks, and linking with external services (like databases that might not need a custom Docker environment).
- Why This Approach?
- Simplicity: Fewer components make a single
Dockerfilesufficient. - Straightforward Setup: Ideal for projects where the main complexity doesn’t lie in the container setup.
- Simplicity: Fewer components make a single
Hybrid Approaches
- Combination of Both Methods:
- Some projects might have multiple services but share a common base environment.
- They might use a base
Dockerfilefor the common setup and additionalDockerfiles for service-specific configurations.
- docker-compose.yml:
- Manages how these various Docker environments interact and work together.
Best Practices
- Use What Fits the Project Needs:
- The choice between single or multiple
Dockerfiles should be based on the project’s complexity and requirements.
- The choice between single or multiple
- Clarity and Maintenance:
- Keeping Docker-related configurations easy to read and maintain should be a priority, regardless of the number of
Dockerfiles.
- Keeping Docker-related configurations easy to read and maintain should be a priority, regardless of the number of
In conclusion, the decision to use multiple Dockerfiles versus consolidating everything in the docker-compose.yml file is largely project-dependent. Larger, more complex projects benefit from the modularity of multiple Dockerfile’s, while smaller projects might find a single Dockerfile sufficient and more manageable.
Can I do Everything With Just docker-compose.yml?
Yes you can, however it’s not the best way to do things. Here is what it would look like:
version: '3'
services:
  app:
    image: node:18
    working_dir: /usr/src/app
    command: /bin/bash -c "if [ ! -d node_modules ]; then npm install; fi && node app.js"
    ports:
      - "3000:3000"
    volumes:
      - .:/usr/src/app
Here we start from a node v18 container, and run a shell command to check for node_modules and install if not found, then run the node app. Also, for the volumes section, we aren’t copying files, but actually mounting the current directory to the container, that was updates are reflected in real time.
Perfect right? Not quite. The problem here is that we aren’t leveraging the static/read only nature of docker images. Normally we would do the npm install once, and it would be saved to the image. But in this way, we are doing it every time we run the container. So we lose both efficiency of a single build, and predictability as the install as could use different package versions depending on repo’s getting upgraded.
So the take away is to use Dockerfile to build/prepare images, and then use docker-compose.yml to orchestrate them.